How to add TailwindCSS 3 to a Hugo website in 2022?
Posted on: 4 March, 2022 4 min(s) read Tags: webdev/
Table of contents:
I use Hugo for my personal website - https://www.unsungnovelty.org. At present I use Bulma for it. But I am working on a redesign with TailwindCSS. During my search, I found articles to add TailwindCSS to Hugo confusing. And at times bloated. So here is a straight forward article (and hopefully easy to follow) on how to add TailwindCSS to a Hugo website. This article is not supposed to show off all the features of TailwindCSS. The goal is a simple and straight forward setup for TailwindCSS in your Hugo website.
If you already have a Hugo website and just want to add TailwindCSS to it’s theme, jump directly to follow How to add TailwindCSS to a Hugo theme?.
How to create a minimal Hugo website & add TailwindCSS to a new hugo theme?
- Install hugo package on your operating system. Follow the Install section from Getting started from gohugo.io. If you are on Windows, the below commands might not work in full. Use a unix shell like bash to make them work.
- Create a new Hugo website using the command
hugo new site <site name>in your terminal. Eg;hugo new site thisSiteIsNew. This will create a new hugo site with a startup template inside the directory calledthisSiteIsNew. - Go inside your new site’s directory. Eg;
cd thisSiteIsNew. - Create a new theme using the
hugo new theme <theme name>. Eg;hugo new theme thisThemeIsNew. This will create a new directory with the<theme name>and necessary files needed to get started. In my case, it will be insidethisSiteIsNew/themes/thisThemeIsNew. - Link the Hugo theme in your config file. An example config file will look like the below. This is a
config.toml. Here I use.tomlformat. If you want to use.jsonor.yamlfor your Hugo config file, you can. Just format it accordingly.
baseURL = ''
languageCode = 'en-us'
title = 'thisSiteIsNew'
theme = 'thisThemeIsNew'
- Initialise
package.jsonusingnpm init -y. This will create apackage.jsonfile inside your theme directory.
How to add TailwindCSS to a Hugo theme?
- Go inside the themes directory. It is in
hugo-website-directory/themes/theme-name/. This assumes you have a hugo website with layouts, config file etc setup. - Gentle reminder - If you haven’t already, link your Hugo theme in your config file. An example config file will look like the below. This is a
config.toml.Here I use.tomlformat. If you want to use.jsonor.yaml, format it accordingly.
baseURL = ''
languageCode = 'en-us'
title = 'thisSiteIsNew'
theme = 'thisThemeIsNew'
- Initialise
package.jsonusingnpm init -y. This will create apackage.jsonfile inside your theme directory. - Install tailwind css using
npm install --save-dev tailwindcss. This installs tailwindcss as a development dependency. - Initialise
tailwind.config.jsby running the commandnpx tailwindcss init. This will create atailwind.config.jsfile. - Inside
tailwind.config.jsfile, add the below code:
module.exports = {
  content: ["content/**/*.md", "layouts/**/*.html"],
  theme: {
    extend: {},
  },
  plugins: [],
};
- Create a file called
input.cssin/assetsdirectory. You can also usemain.cssinstead ofinput.cssas mentioned in tailwindcss documentation. Also, If this is a new theme,/assetsdirectory won’t be present and you should create it.mkdir assetsin Linux for create a new directory. - Add the below code to
input.cssfile.
@tailwind base;
@tailwind components;
@tailwind utilities;
- Create an
output.cssinside the/assetsfolder. We will use the tailwindcss cli to transpile the stuff needed frominput.csstooutput.css.output.csswhich will be our final css file. - Add some tailwind css utilities to your html files. I have the below
index.htmlwhich is the home page of a hugo website.
{{ define "main" }}

    <h1 class="text-3xl text-blue-700 font-bold underline">thisSiteIsNew</h1>
    <p class="bg-sky-600 text-slate-100">The thisSiteIsNew uses a theme called thisThemeIsNew</p>

{{ end }}
- Link your
output.cssto your website by linking the stylesheet in the/layouts/partials/head.html. An examplehead.htmllooks like the below:
<head>
    <meta charset="UTF-8" />
    <meta name="viewport" content="width=device-width, initial-scale=1.0" />
    <title>Hello Hugo</title>

    {{ $style := resources.Get "output.css" }}
    <link rel="stylesheet" href="{{ $style.Permalink }}">

</head>
- Add the below script/command to
package.jsonfile. This is needed to build theoutput.cssfrom yourinput.cssbased on the utility classes you added in the previous step.
"scripts": {
    "build-tw": "npx tailwindcss -i ./assets/input.css -o ./assets/output.css"
  },
You can use any name instead of build-tw here. I just use build-tw which easily translates to build tailwind.
-
Everytime you make changes to your styling using tailwind utilities, you can run
npm run build-tw. This will create a newoutput.cssfile. -
Now go back to the Hugo site’s directory from
/themes/thisThemeIsNew. -
And from inside
/thisSiteIsNewrunhugo server --disableFastRenderin your terminal. It will start a live server inhttp://localhost:1313/by default. Otherwise you will have the address in the terminal. That is it. A Hugo website which uses TailwindCSS.
If you have followed all the steps, you should have a Hugo website with the below output.
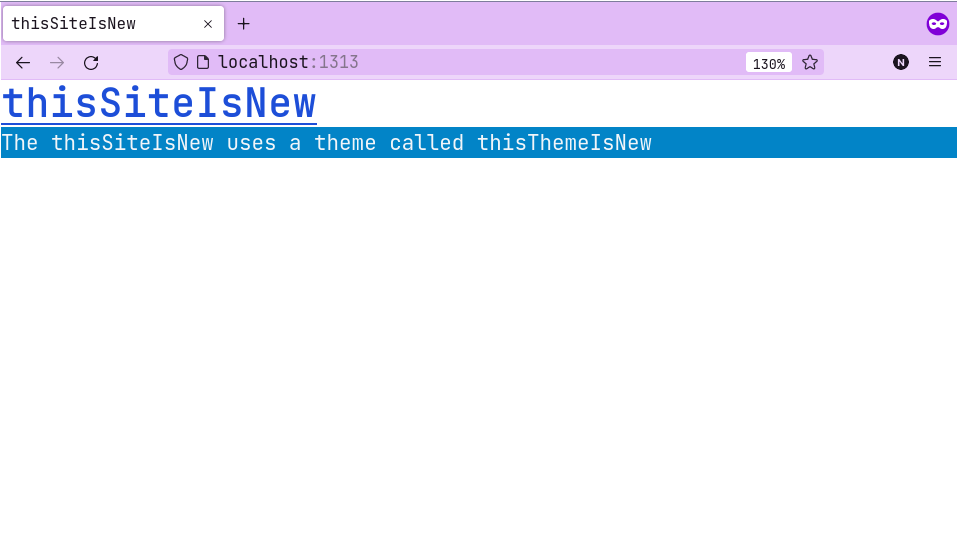
Final output if you have followed the article step by step.
References / links
Found an error? Know a better way to do this? Have feedback on my writing? DM me on Twitter @unsungNovelty or drop a mail to unsungnovelty at protonmail dot com.